PrivilegesDemoter v3.0

PrivilegesDemoter version 3 is here, and it’s a big update. While the main functions remain, several new options are available to make deployment and configuration much more flexible.

The original posts for previous versions are available here:
v1.0
v2.0

Version 3 is available on GitHub

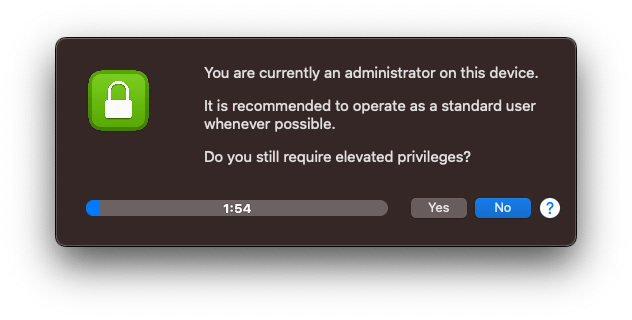
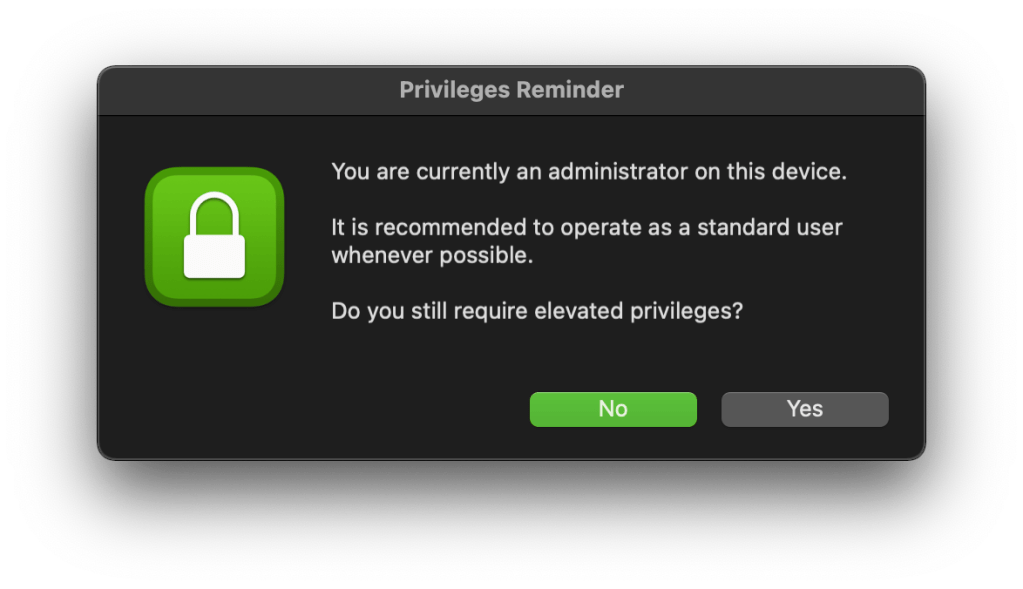
PrivilegesDemoter is a script that allows users to self manage local administrator rights, while reminding them not to operate as an administrator for extended periods of time. Additionally, each elevation and demotion event is recorded and saved to a log file.

PrivilegesDemoter 3 has been written to be customizable for a number of different deployment scenarios. PrivilegesDemoter may be used on its own in standalone mode, or conjunction with SAP Privileges. It may be configured to notify users with IBM Notifier, Swift Dialog, or Jamf Helper.

The PrivilegesDemoter script runs every 5 minutes to check if the currently logged in user is an administrator. If this user is an admin, it adds a timestamp to a file and calculates how long the user has had admin rights. Once that calculation passes a certain threshold, the user is reminded to operate as a standard user whenever possible.

Summary of Changes in v3

  • PrivilegesDemoter now uses just one script and one LaunchDaemon (as opposed to 2 of each in versions 1 and 2)
  • The script is controlled with a configuration profile (blog.mostlymac.privilegesdemoter).
  • There is a JSON Schema available for configuring with Jamf Pro.
  • You can now exclude multiple administrator accounts from demotion.
  • The _mbsetupuser and root users are now excluded from demotion by default.
  • Swift Dialog is now available as a notification agent in addition to IBM Notifier and Jamf Helper.
  • You may now use a custom name for the IBM Notifier binary (if you have re-branded it for your organization).
  • The demotion reminder threshold can now be set with a configuration profile separately from the SAP Privileges dock tile timeout.
  • The main text in the reminder can be customized.
  • You many now configure the user to be demoted silently without a notification at all.
  • The demotion script now runs locally by default. If you would like it to run from Jamf Pro as it did in versions 1 and 2, you may configure it that way.
  • You may now customize the Jamf trigger if demoting from a Jamf Pro policy.
  • The script now allows for standalone elevation and demotion actions (without deploying SAP Privileges) Note: This requires an MDM with the ability to run scripts from a Self Service portal (like Jamf Pro).
  • The script now includes several new options when running locally. Using the script alone you can elevate, demote, demote silently, print the current user’s status, and calculate how much admin time has passed since the last time PrivilegesDemoter ran.

More information about how to set-up, use, and configure all of the above is available in the GitHub Wiki for the PrivilegesDemoter project.

Demote on Login with SAP Privileges

This blog post outlines using a LaunchAgent that utilizes the PrivilegesCLI to demote users during login. This ensures that all users have standard privileges at the beginning of each user session.

Note: All of the following assumes that the SAP Privileges application is installed.

If that sounds interesting or useful, good news! It is really rather easy to implement.

The LaunchAgent includes a couple of sections:

  • AssociatedBundleIdentifiers – This section associates the LaunchAgent with the SAP Privileges application so that it is displayed properly in the Login Items GUI on macOS Ventura and newer operating systems.
  • ProgramArguments – This section runs the following PrivilegesCLI command to remove user rights: /Applications/Privileges.app/Contents/Resources/PrivilegesCLI --remove
  • RunAtLoad – Ensures that the LaunchAgent runs each time a new user session is loaded.

To implement this LaunchAgent, either build a package or copy the following plist file into /Library/LaunchAgents, and make sure that it has the following permissions: 644 POSIX and root:wheel as owner:group.

<?xml version="1.0" encoding="UTF-8"?>
<!DOCTYPE plist PUBLIC "-//Apple//DTD PLIST 1.0//EN" "http://www.apple.com/DTDs/PropertyList-1.0.dtd"&gt;
<plist version="1.0">
<dict>
<key>AssociatedBundleIdentifiers</key>
<array>
<string>corp.sap.privileges</string>
</array>
<key>Label</key>
<string>blog.mostlymac.demoteonlogin</string>
<key>ProgramArguments</key>
<array>
<string>/Applications/Privileges.app/Contents/Resources/PrivilegesCLI</string>
<string>–remove</string>
</array>
<key>RunAtLoad</key>
<true/>
</dict>
</plist>

The next time a user logs in, Privileges will ensure the session starts with standard user rights. Users may then use SAP Privileges to grant admin rights again as needed.

Use the Jamf API to Update a Smart Group with App Versions from AutoPkg

This post will outline a method to get app versions from AutoPkg and apply those version numbers to a single smart group in Jamf Pro.

I was inspired by the Jamf Tech Thoughts post, “Custom Self Service Patch Notifications” by ThomM. In it, Thom discusses using a custom alert that directs users to the “Notifications” section of Self Service where they can apply pending updates. Thom goes into some detail in that post about why this might be needed/preferred vs using the built-in notifications.

My only issue with implementing Thom’s workflow is that when using AutoPkg (and Jamf Upload), updating the smart group that identities out of date apps can become cumbersome rather quickly. So I created a workflow to automate updating that smart group.

To make this work there is bit of setup involved.

Assumptions:

This script assumes that you are using AutoPkg with Graham Pugh’s Jamf Upload processors. In our environment we have recipes configured to upload new packages to Jamf Pro, then add those new updates to patch management policies. This means that all of our recipes already include the PATCH_SOFTWARE_TITLE_ID key. If that is not true in your environment, you can add something like the following to each recipe override:

<key>PATCH_SOFTWARE_TITLE_ID</key>
<string>52</string>

It is assumed that you have a Jamf Pro API user configured for AutoPkg and Jamf Upload. The required permissions are listed in the github wiki here.

Prerequisites:

You will need to add Graham Pugh’s LastRecipeRunResult post processor to each recipe that you intend to use this method with. This processor creates a JSON file containing the results of the last run and requires no input.

I added this as the last processor in each recipe:

<dict>
<key>Processor</key>
<string>com.github.grahampugh.recipes.postprocessors/LastRecipeRunResult</string>
</dict>

After adding the processor, running the recipe again should generate the latest_version.json file in your AutoPkg cache.

The next prerequisite is to install jq so that we can easily parse JSON data. I used homebrew to accomplish this with: brew install jq

The Jamf Pro API user that is configured for AutoPkg will need two additional permissions:

  1. Read access to Jamf Pro Server Objects > External Patch Sources
  2. Read access to Jamf Pro Server Settings > Internal Patch Sources

Configuration

Configuring the script requires the following:

  • Enter the user account you are running AutoPkg from
  • Enter the path to your recipe list
  • Enter the ID and name of the group that you would like to update
  • Optionally enter a site name and id
  • Optionally enter any recipes from your recipe list that should be excluded

Once configured the script should be able to update a single smart group with many app versions so that you can identify all computers with one or more apps that are out of date.

Script Overview

The script performs the following actions:

  • Downloads all patch titles from all sources on your Jamf Pro server and saves them to a local file
  • Creates a local xml file to store smart group data
  • Reads each recipe from your recipe list in turn
  • Gets the app version from the latest_version.json created by the LastRecipeRunResult post processor
  • Gets the Patch Title ID from the recipe
  • Matches the Patch Title ID from the recipe to the Patch Title Name stored in the local file from step 1. (This is required because the patch title name in Jamf Pro can be edited and does not always match the actual name required for smart group criteria.)
  • Adds the name and version criteria to the smart group xml file
  • Uploads the smart group xml file to Jamf Pro

Usage

./autopkg-update-smart-group.sh [options]

You can pass the --dry-run option to have the script check for errors and create the xml file without uploading anything to Jamf Pro.

Implementation

We scoped an alert (using IBM Notifier) to this group that directs users to perform pending updates. Other options would be to use Jamf Helper or SwiftDialog for reminders.

The script is intended to be run from the same computer that AutoPkg is installed on. I have it running as part of our autopkg conductor run as the first action. This way, there is a 24 hour period between new apps being added to Self Service and users getting notified about them.

The Script:

#!/bin/bash
#####################################################################################################
#
# SCRIPT: autopkg-update-smart-group.sh
# AUTHOR: Sam Mills (@mostlymac; github.com/sgmills)
# DATE: 08 December 2022
# REV: 1.0
#
#####################################################################################################
# USAGE
#
# ./autopkg-update-smart-group.sh
# Use option –dry-run to report errors and preview smart group before making changes in Jamf Pro
#
#####################################################################################################
# ASSUMPTIONS
#
# It is assumed that all recipes in your recipe list contain a Patch Software Title ID
#
# If this is not true, add the following key to each recipe override and supply the appropriate ID
# <key>PATCH_SOFTWARE_TITLE_ID</key>
# <string>52</string>
#
# The patch software title id can be found in the url for each patch title.
# In the following example, the ID is 52
# https://yourOrg.jamfcloud.com/patch.html?id=52&o=r
#
#—————————————————————————————————#
#
# It is assumed that you have added Graham Pugh's LastRecipeRunResult post processor to each recipe
# that you intend to use this method with. This processor creates a JSON file containing the results
# of the last autopkg run for each recipe and requires no input.
#
# See below for an example. This should be the last processor in each recipe:
# <dict>
# <key>Processor</key>
# <string>com.github.grahampugh.recipes.postprocessors/LastRecipeRunResult</string>
# </dict>
#
# For more information on the LastRecipeRunResult post processor, please see the link below:
# https://github.com/autopkg/grahampugh-recipes/blob/main/PostProcessors/LastRecipeRunResult.py
#
#—————————————————————————————————#
#
# It is assumed that you have jq installed to parse JSON. To install with homebrew: brew install jq
#
#—————————————————————————————————#
#
# It is assumed that your Jamf Pro API user has the following permissions, in additon to any already
# required for Jamf Upload
#
# Read access to Jamf Pro Server Objects > External Patch Sources
# Read access to Jamf Pro Server Settings > Internal Patch Sources
#
#####################################################################################################
# EDITABLE VARIABLES
#
# Adjust the following variables for your particular configuration.
#
# autopkgUser – This should be the user account you're running AutoPkg in
# autopkgUserHome – This should be the home folder location of the AutoPkg user account
# autoPkgCache – This should be the location of your AutoPkg cache directory
#
# Note: The home folder and AutoPkg cache locations are currently set to be automatically discovered
# using the autopkgUser variable.
autopkgUser="autopkg"
autopkgUserHome=$(/usr/bin/dscl . -read /Users/"$autopkgUser" NFSHomeDirectory | awk '{print $2}')
autoPkgCache="$autopkgUserHome/Library/AutoPkg/Cache"
# recipeList – This is the location of the plain text file being used to store
# your list of AutoPkg recipes. For more information about this list, please see
# the link below:
# https://github.com/autopkg/autopkg/wiki/Running-Multiple-Recipes
recipeList="$autopkgUserHome/Library/Application Support/AutoPkgr/recipe_list.txt"
# If you're using Jamf Upload, your Jamf Pro server and API user information should be
# populated automatically. If you're not using Jamf Upload, set this information accordingly.
jamfUser="$( /usr/bin/defaults read "$autopkgUserHome"/Library/Preferences/com.github.autopkg.plist API_USERNAME )"
jamfPass="$( /usr/bin/defaults read "$autopkgUserHome"/Library/Preferences/com.github.autopkg.plist API_PASSWORD )"
jamfURL="$( /usr/bin/defaults read "$autopkgUserHome"/Library/Preferences/com.github.autopkg.plist JSS_URL )"
# groupName – This should be the name of the Jamf Pro Smart Group that will be updated
# groupID – This should be the ID of the Jamf Pro Smart Group that will be updated
# Note: The group must already exisit in Jamf Pro. This script will not create one
groupName="Managed Apps Out-Of-Date"
groupID="123"
# jqLocation – This should be the location of the jq binary.
# Currently set to be automatically discovered
jqLocation="$(/usr/bin/which jq)"
#####################################################################################################
# OPTIONAL VARIABLES
# siteID – This should be the ID of the site for your smart group. Leave blank if no sites
# siteName – This should be the name of the site for your smart group. Leave blank if no sites
siteID=""
siteName=""
# If you would like to exclude any recipes from your recipe list, enter them here.
# Recipe names should be enclosed in quotes and separated by a space as shown below:
# excludedRecipes=("local.jamf.Chrome-patch" "local.jamf.Firefox-patch")
excludedRecipes=()
#####################################################################################################
# USE CAUTION EDITING BELOW THIS LINE
#####################################################################################################
# FUNCTIONS
# Function uses Basic Authentication to get a new bearer token for API authentication
GetJamfProAPIToken() {
api_token=$(/usr/bin/curl -X POST –silent -u "${jamfUser}:${jamfPass}" "${jamfURL}/api/v1/auth/token" | plutil -extract token raw –)
}
# Function to collect all internal and external patch sources and save the patch available titles.
# Saving this data to a file reduces API calls and speeds up operations.
# Takes one argument: internal or external
savePatchAvailableTitles () {
# Get the source ids
patchSourceIDs="$( /usr/bin/curl -s -H "authorization: Bearer ${api_token}" \
"Accept: text/xml" –request GET \
"$jamfURL"/JSSResource/patch"$1"sources | \
/usr/bin/xmllint –format – | \
/usr/bin/grep -e "<id>" | \
/usr/bin/awk -F "<id>|</id>" '{ print $2 }' )"
# For each patch source, append all patches to a file
for id in $patchSourceIDs; do
/usr/bin/curl -s -H "authorization: Bearer ${api_token}" \
"Accept: text/xml" –request GET \
"$jamfURL"/JSSResource/patchavailabletitles/sourceid/"$id" | \
/usr/bin/xmllint –format – >> "$patchAvailableTitles"
done
}
# Function to check if array contains a recipe
containsRecipe () {
local e
for e in "${@:2}"; do [[ "$e" == "$1" ]] && return 1; done
return 0
}
# Function to verify xml and PUT computer group to Jamf Pro
updateSmartGroup () {
echo ""
echo "Verifying XML data"
# If xml is valid, create a new comptuer group from file
if xmllint "$smartGroupData" 1> /dev/null; then
echo "XML is valid. Updating $groupName on Jamf Pro Server $jamfURL"
# Use Jamf Pro API to put data
/usr/bin/curl -s -H "authorization: Bearer ${api_token}" \
-H "Accept: application/xml" -H "Content-type: application/xml" –request PUT \
"${jamfURL}"/JSSResource/computergroups/id/"${groupID}" \
–upload-file "$smartGroupData"
else
echo "XML is invalid! Cannot upload to Jamf Pro. Exiting…"
exit 1
fi
}
# Invalidates the Jamf API token so it can no longer be used
InvalidateToken() {
/usr/bin/curl "${jamfURL}/api/v1/auth/invalidate-token" –silent –header "Authorization: Bearer ${api_token}" -X POST
api_token=""
}
#####################################################################################################
# PRELIMINARY CHECKS
# If the AutoPkg cache directory is missing, stop the script with an error.
if [[ ! -d "$autoPkgCache" ]]; then
echo "AutoPkg cache directory ($autoPkgCache) does not exist. Exiting…"
exit 1
fi
# If the AutoPkg recipe list is missing or unreadable, stop the script with an error.
if [[ ! -r "$recipeList" ]]; then
echo "Recipe list ($recipeList) is missing or unreadable. Exiting…"
exit 1
fi
# If Jamf Pro API user info is missing, stop the script with an error
if [[ -z $jamfUser ]] || [[ -z $jamfPass ]] || [[ -z $jamfURL ]]; then
echo "Jamf Pro API username, password, or URL is missing. Exiting…"
exit 1
fi
# If Jamf Pro smart group info is missing, stop the script with an error
if [[ -z $groupID ]] || [[ -z $groupName ]]; then
echo "Jamf Pro smart group name or id is missing. Exiting…"
exit 1
fi
# If jq is missing, stop the script with an error.
if [[ ! -x "$jqLocation" ]]; then
echo "jq is not installed. Exiting…"
exit 1
fi
#####################################################################################################
# GET A JAMF PRO API TOKEN
# Use function to get an API token
GetJamfProAPIToken
#####################################################################################################
# GET ALL AVAILABLE PATCH TITLES
# xml file for all available patch titles
patchAvailableTitles="/private/tmp/patchAvailableTitles.xml"
# Remove old patch title xml file if needed
rm "$patchAvailableTitles" 2> /dev/null
# Use fuction to collect patch avaialble titles
savePatchAvailableTitles "internal" 2> /dev/null
savePatchAvailableTitles "external" 2> /dev/null
# Check that there is now data in the file
if [[ ! -s "$patchAvailableTitles" ]]; then
echo "No available patch titles found on Jamf Pro server. Exiting…"
fi
#####################################################################################################
# CREATE THE XML FOR SMART GROUP
# xml file for uploading smart group to Jamf Pro
smartGroupData="/private/tmp/smartGroupData.xml"
# Remove old smart group xml file if needed
rm "$smartGroupData" 2> /dev/null
# Add opening tag and set the smart group name
echo "<computer_group>
<name>$groupName</name>
<is_smart>true</is_smart>" >> "$smartGroupData"
# Add site info to smart group xml
# If both site id and site name are supplied, write them
if [[ -n $siteID ]] && [[ -n $siteName ]]; then
echo " <site>
<id>$siteID</id>
<name>$siteName</name>
</site>
<criteria>" >> "$smartGroupData"
# If either site id or site name are missing report error
elif [[ -n $siteID ]] || [[ -n $siteName ]]; then
echo "Either siteID or siteName variable is missing."
exit 1
# If no site info is entered, use default values
else
echo " <site>
<id>-1</id>
<name>None</name>
</site>
<criteria>" >> "$smartGroupData"
fi
#####################################################################################################
# ADD PATCHES TO XML FOR SMART GROUP
# Set priority for smart group items to 0
priority=0
# For each recipe in the list, append to xml data
while IFS="" read -r recipe || [ -n "$recipe" ]; do
# Check if the recipe is excluded
containsRecipe "$recipe" "${excludedRecipes[@]}"
excludedRecpeResult="$?"
# If recipe is in exclusions skip it
if [[ "$excludedRecpeResult" = 1 ]]; then
echo "[ ] $recipe is excluded. Skipping…"
else
# Get the json file with the latest version in it
appLatestVersionJSON="$autoPkgCache/$recipe/latest_version.json"
# Use jq to parse json and extract version number
appVersion="$( "$jqLocation" -r '.version' "$appLatestVersionJSON" )"
# Get the patch title id from autopkg recipe
patchTitleID="$( /usr/local/bin/autopkg info "$recipe" | grep "PATCH_SOFTWARE_TITLE_ID" | awk -F "'" '{print $4}' )"
# Use patch title id to get the patch title name id (identifies actual name even if chagned in Jamf Pro UI)
patchTitleNameID="$( /usr/bin/curl -s -H "authorization: Bearer ${api_token}" \
"Accept: text/xml" –request GET \
"$jamfURL"/JSSResource/patchsoftwaretitles/id/"$patchTitleID" | \
/usr/bin/xmllint –format – | \
/usr/bin/grep -e "<name_id>" )"
# Use the patch title name id to get the jamf patch title name
patchTitleName="$( /usr/bin/grep -A4 "$patchTitleNameID" "$patchAvailableTitles" | \
/usr/bin/awk -F "<app_name>|</app_name>" '{ print $2 }' | xargs )"
# If if any required data is mising, skip recipe
if [[ -z $appLatestVersionJSON ]]; then
echo "[ ] No latest_version.json in $autoPkgCache/$recipe directory. Skipping $recipe"
elif [[ -z $appVersion ]] || [[ $appVersion == "null" ]]; then
echo "[ ] No version information found in latest_version.json for $recipe. Skipping…"
elif [[ -z $patchTitleID ]]; then
echo "[ ] Unable to determine Patch Title ID. Is it defined in $recipe? Skipping…"
elif [[ -z $patchTitleNameID ]]; then
echo "[ ] Unable to determine the Patch Title name_id for $recipe. Skipping…"
elif [[ -z $patchTitleName ]]; then
echo "[ ] Unable to match name_id: $patchTitleNameID to a Patch Title Name for $recipe. Skipping…"
# If all required data is present, add it to the smart group
else
echo " <criterion>
<name>Patch Reporting: $patchTitleName</name>
<priority>$priority</priority>
<and_or>or</and_or>
<search_type>less than</search_type>
<value>$appVersion</value>
<opening_paren>false</opening_paren>
<closing_paren>false</closing_paren>
</criterion>" >> $smartGroupData
echo "[+] Added $patchTitleName version $appVersion to $groupName XML file"
# Increment priority by 1
((priority=priority+1))
fi
fi
done < "$recipeList"
# Add closing tags to xml for smart group
echo " </criteria>
</computer_group>" >> "$smartGroupData"
#####################################################################################################
# GET INPUTS
# Allow for passing dry-run input
while test $# -gt 0; do
case "$1" in
–dry-run)
# Set the dry-run flag to true
dryRun=1
;;
esac
shift
done
#####################################################################################################
# UPDATE SMART GROUP
# Check for dry run and update smart group accordingly
if [[ $dryRun = 1 ]]; then
echo "Dry run complete. XML data is located at: $smartGroupData"
echo "Nothing uploaded. Nothing changed on Jamf Pro Server $jamfURL"
else
updateSmartGroup
fi
#####################################################################################################
# INVALIDATE TOKEN
# Use function to invalidate Jamf Pro API token
InvalidateToken

Install a Company Logo Without a Pkg using Jamf Pro

I have been doing this little trick for years so I thought I would create a blog post to share it.

Imagine you need to get your company logo onto computers so that you can brand some widget. When using tools that the user can interact with (like Nudge, IBM Notifier, Jamf Helper, SwiftDialog, or DEPNotify for instance) having a familiar logo or icon helps users to understand, verify, and trust the source of that window when it is presented. There’s the added benefit that it looks good too!

This method can be used to get any image file placed in any location, without having to build a package for distribution, all within Jamf Pro.

All you need do is upload an image to the Self Service section of a policy in Jamf, then use curl in a script to download that image from your Jamf Pro server and place it in the specified location. Here’s how I set it up:

  1. Upload the following script to your Jamf Pro server:
#!/bin/bash
fetch_from="$4"
save_to="$5"
# Check for the image and grab it if it does not exist
if [ ! -f "$save_to" ]; then
curl -o "$save_to" "$fetch_from"
fi
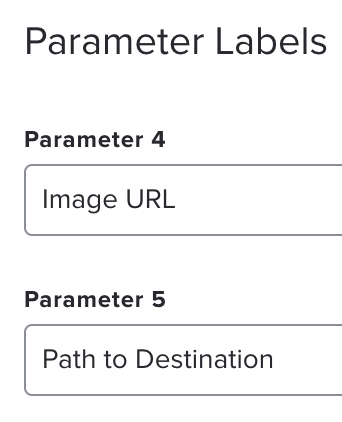
  1. Give the script parameters some useful labels. I used “Image URL” for parameter $4. This is the location of the image we will download. And “Path to Destination” for parameter $5. This is where the image will be saved on disk.
  1. Create a new policy in Jamf Pro and save it.
    IMPORTANT: When first creating the policy, leave it disabled by unchecking the “Enabled” checkbox.
  • General
  • Name: Download Company Logo
  • Enabled: No
  • Trigger: Recurring Check-in
  • Frequency: Once per computer
  • Scripts
  • Select script uploaded previously – do not configure any parameter values yet.
  • Scope
  • Targets: All Managed Clients or All Computers
  • Self Service
  • Check the box for “Make the policy available in Self Service”
  • Upload the image you would like to distribute.
  1. After creating and saving your policy, go to the Self Service tab and find the icon that you uploaded. Right click and select “Copy Image Address” to copy the URL of the image to your clipboard. Take note of this URL.
  1. While still on the Self Service page for your policy, click Edit in the lower right corner, then deselect the checkbox for “Make the policy available in Self Service”. Even though the policy is no longer available in Self Service, the icon remains so we can still access it in our script.
  1. Select the Options tab, then the Scripts section. Paste the image URL copied in step 4 into the “Image URL” field under Script Parameters.
  1. Enter the full path to where the image should be placed on disk, including the image name, into the “Path to Destination” field under Script Parameters. For example /Users/Shared/logo.png
  1. Return to the General section and check the Enabled box to enable the policy, then Save in the lower right corner.

That’s it. The image will be downloaded to each machine in scope and placed in the location of your choice. Now you can reference that image in other scripts and configurations as needed.

Privileges Demoter v2.0

I have made some changes to the Privileges Demoter tool that are significant enough to benefit from a blog post. The original post for v1.0 is available here.

The new version is available on GitHub

Privileges Demoter is a tool, used in conjunction with the SAP Privileges app, that reminds users not to operate as an admin, and logs when a user switches from admin to standard and vice versa.

Changes in v2

The notification now relies on the IBM Notifier application, and only falls back to Jamf Helper if needed. IBM Notifier is included in the package installer, so no need to manage that separately. This allows for more flexibility such as a help button, a notification sound, and better exit codes.

v2 also includes the ability to exclude an admin account from ever seeing the reminder, or being demoted. If you have an admin account across your fleet, this feature can come in handy.

Log rotation is now enabled to ensure that excessive, or long term use does not bloat log files.

There are now two versions of the installer. One version includes just the PrivilegesDemoter pieces, while the other will install both PrivilegesDemoter and the Privileges application. This way you can deploy by installing just one package instead of managing things separately.

Installation

Recommended steps to begin using PrivilegesDemoter v2:

  1. Download the installer package that includes both PrivilegesDemoter and the Privileges application from GitHub. Available here: PrivilegesDemoter_PrivilegesApp-2.0.pkg
  2. Upload the package to your MDM.
  3. Create and scope a policy to install the package on devices.
  4. Upload the Demote Admin Privileges.sh script to your MDM.
  5. Configure a policy to run Demote Admin Privileges.sh

Script Configuration

  1. Configure a policy to run Demote Admin Privileges.sh
    1. IMPORTANT: Use custom trigger “privilegesDemote(this trigger is hard coded in the privileges demotion LaunchDaemon)
    2. Set it to ongoing
    3. Make it available offline
    4. Scope to all devices with Privileges installed

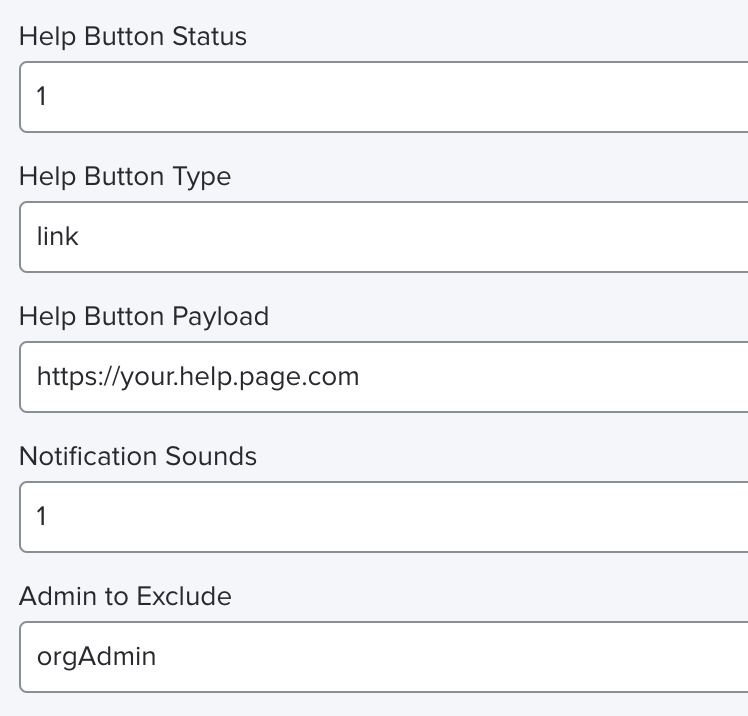
5. Configure the options for Demote Admin Privileges.sh by editing the script, or using Jamf Pro script parameters.

  • help_button_status should be set to 1 to enable the help button, or 0 to disable.
  • help_button_type may be set to either link or infopopup
  • help_button_payload defines the payload for the help button. Either a URL for link type, or text for infopopup type.
  • notification_sound is enabled by default. Set to 0 to disable. Leave blank or set to 1 to enable.
  • admin_to_exclude may be set to the username of an admin that should be excluded from the reminder and never be demoted.

Updating from v1 to v2

  1. You may install the v2 package over top of the v1 package safely. Simply install the new package to update.
  2. You must also update the demotion script in your MDM. Upload the new Demote Admin Privileges.sh script, or overwrite the old one.
    1. Configure script parameter options with helpful names as shown above
  3. Configure the available options in the policy as needed.

Jamf Pro Extension Attribute

The following Extension Attribute may be used to identify devices that have been updated to v2 of PrivilegesDemoter.

#!/bin/sh
# Get PrivilegesDemoter version
version=$( grep Version /usr/local/mostlymac/checkPrivileges.sh | cut -f2 -d ":" )
# If version is present, set result
if [ "$version" ]; then
RESULT=$version
fi
# Return version
/bin/echo "<result>${RESULT}</result>"

Nudge Extension Attribute

What is Nudge?

Nudge is an open source application (primarily created by Erik Gomez) that strongly encourages users to apply macOS updates.

Nudge has been written and talked about plenty of times by my fellow MacAdmins, so I’ll spare you the details. Here are some links if you want more info:

Getting Data from Nudge into Jamf Pro

Nudge stores information about the next time Nudge will run, the minimum required OS version you have defined, and how many deferrals have been used in the plist located at ~/Library/Preferences/com.github.macadmins.Nudge.plist

Notice this is in the user’s local Library. If we want to report this data, we will need to do it in the user context. I have developed the following Jamf Pro extension attribute to do just that.

The following EA will grab the currently logged in user (or the last user if there isn’t one) and read the requiredMinimumOSVersion key value from the com.github.macadmins.Nudge plist. If a value exists, we use the is-at-least function built in to zsh to compare this to the currently installed macOS version. If an update is required, we report the number of deferrals used. This can be useful to ensure that Nudge is running successfully, or to see which users are procrastinating (and how much).

  • If the requiredMinimumOSVersion key is not found, the EA will report No minimum required macOS version found
  • If the requiredMinimumOSVersion key is found, but macOS is already greater than or equal to that value, the EA will report macOS meets minimum required version
  • If macOS does not yet meet the minimum required version, the EA will report the value found in the userDeferrals key. This key is the sum of userSessionDeferrals and userQuitDeferrals.

And here is that extension attribute. Note that it is written in zsh so that we can access functions specific to that shell. It will not work with a .sh extension.

#!/bin/zsh
# Get the currently logged in user
currentUser="$( scutil <<< "show State:/Users/ConsoleUser" | awk '/Name :/ && ! /loginwindow/ { print $3 }' )"
# Check for a logged in user and proceed with last user if needed
if [[ $currentUser == "" ]]; then
# Set currentUser variable to the last logged in user
currentUser=$( defaults read /Library/Preferences/com.apple.loginwindow lastUserName )
fi
# Get the current user's UID
currentUserID="$( id -u "$currentUser" )"
# Nudge plist name
nudgePlist="com.github.macadmins.Nudge.plist"
# Get the current OS version
osVersion="$( /usr/bin/sw_vers -productVersion )"
# Get the required minimum OS version from the plist
minOS="$( launchctl asuser "$currentUserID" sudo -u "$currentUser" defaults read $nudgePlist requiredMinimumOSVersion 2>/dev/null )"
# Report info from nudge plist
if [[ $minOS ]]; then
# Check if OS version meets the requirement using zsh is-at-least function
autoload is-at-least
if is-at-least "$minOS" "$osVersion"; then
result="macOS meets minimum required version"
# If not up-to-date, get the number of deferrals from the plist
else
result="$( launchctl asuser "$currentUserID" sudo -u "$currentUser" defaults read $nudgePlist userDeferrals )"
fi
else
result="No minimum required macOS version found"
fi
echo "<result>${result}</result>"

Smart Group

This extension attribute reports its result as a string. That means we cannot access the integer comparison tools within a Jamf Pro smart group, but we can use a regex.

I set up a smart group to find all devices where the Nudge deferral value is greater than 0 with the regex: ^[1-9][0-9]*$

Use Jamf Self Service to Enable TouchID for sudo

As you may be aware, it is possible to use a fingerprint on any TouchID enabled Mac (or Magic Keyboard with TouchID) to authenticate sudo at the command line.

This possibility has been discussed many times by many MacAdmins, and Mac enthusiasts over the years. The earliest mention I could find is from 2017. Cabel Sasser tweeted:

Pro MacBook Pro Tip: have a Touch Bar with Touch ID? If you edit /etc/pam.d/sudo and add the following line to the top…

auth sufficient pam_tid.so

…you can now use your fingerprint to sudo!— Cabel

(@cabel) November 16, 2017

sudo on the command-line is great. It enforces security and separation by running under your own user, and it logs actions taken using sudo. But it can be a pain to type longer passwords and passphrases repeatedly. By using TouchID to authenticate, we can keep all the security, while reducing long password entries.

All we have to do is edit the file /etc/pam.d/sudo and add the following line at the top:

auth sufficient pam_tid.so

Save and you’re done. However, there are a few caveats. For one, the sudo file gets overwritten with default values each time macOS is updated. That is where our Self Service policy comes in. The script below can be placed in Self Service, allowing users to re-enable the feature with the click of a button after each update.

The script will check if TouchID is already enabled for sudo, and only enable it if needed. The original sudo file gets backed up to /etc/pam.d/sudo.bak.

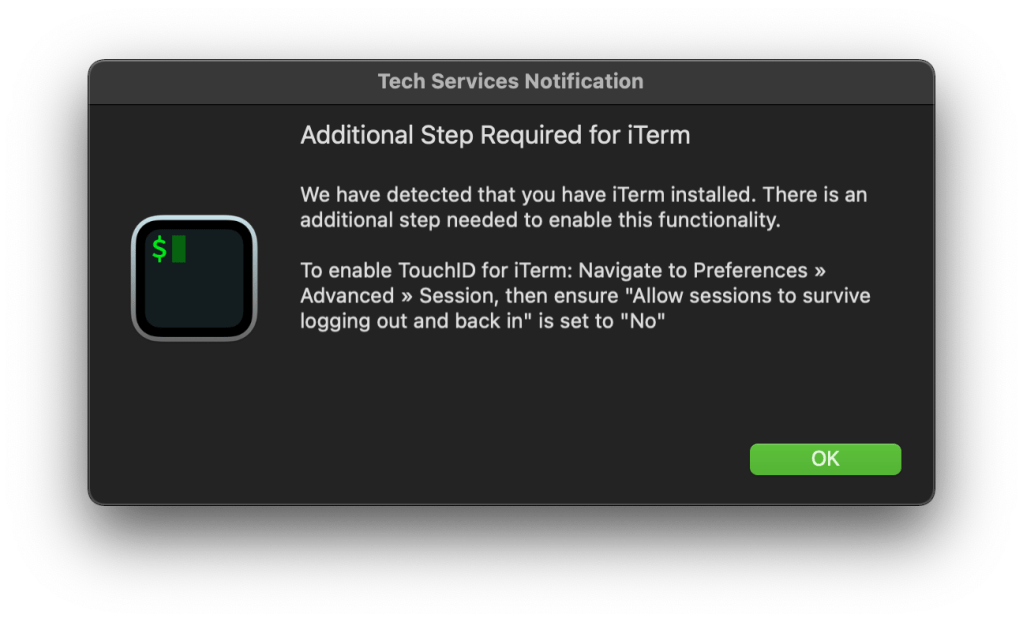
Another caveat is that this feature does not work in iTerm2 unless a specific setting is changed. The script handles that too. If iTerm is installed, it will check if the required setting is enabled to allow TouchID. If the setting needs to be changed, a Jamf Helper message will let the user know what to do. Note this is a one time only change, once the setting is correct, users will not see the following message.

Additional step required for iTerm

If you do not use Jamf, the Jamf Helper section could easily be replaced with something more appropriate for your environment, or removed altogether.

Without further ado, here is our script:

#!/bin/bash
# Get the current user and their UID
currentUser=$( scutil <<< "show State:/Users/ConsoleUser" | awk '/Name :/ && ! /loginwindow/ { print $3 }' )
currentUserID=$( id -u "$currentUser" )
# This is the line we need to add to enable TID
enableTouchID="auth sufficient pam_tid.so"
# Original sudo file location
sudoFile="/etc/pam.d/sudo"
# If TouchID is already enabled exit. Otherwise modify the sudo file
if fgrep -q "$enableTouchID" "$sudoFile"; then
echo "TouchID for sudo is already enabled. Doing nothing…"
else
echo "TouchID not enabled for sudo. Enabling now…"
# Write new file with line to enable touch ID
awk 'NR==2 {print "auth sufficient pam_tid.so"} 1' $sudoFile > $sudoFile.new
# Make a backup of the current sudo file
cp $sudoFile $sudoFile.bak
# Replace the current file with the new file
mv $sudoFile.new $sudoFile
fi
# If iTerm is installed, tell the user what they need to change to enable this setting
if [ -d '/Applications/iTerm.app' ]; then
# Read iTerm preference key
iTermPref=$( launchctl asuser "$currentUserID" sudo -u "$currentUser" defaults read com.googlecode.iterm2 BootstrapDaemon 2>/dev/null )
# If preference needs to be set, show Jamf Helper window with instructions
if [[ "$iTermPref" == "0" ]]; then
echo "iTerm preference is already set properly. Doing nothing…"
else
echo "Notifying user which iTerm setting needs to be changed…"
# Set notification description
description="We have detected that you have iTerm installed. There is an additional step needed to enable this functionality.
To enable TouchID for iTerm: Navigate to Preferences » Advanced » Session, then ensure \"Allow sessions to survive logging out and back in\" is set to \"No\""
# Display notification
"/Library/Application Support/JAMF/bin/jamfHelper.app/Contents/MacOS/jamfHelper" \
-windowType utility \
-title "Tech Services Notification" \
-heading "Additional Step Required for iTerm" \
-description "$description" \
-alignDescription left \
-icon "/Applications/iTerm.app/Contents/Resources/AppIcon.icns" \
-button1 "OK" \
-defaultButton 1
fi
fi

I would advise adding the above script to Jamf Pro, then setting up a Self Service policy like so:

  • General
  • Name: Enable TouchID for sudo
  • Trigger: Self Service
  • Frequency: Ongoing
  • Scripts
  • Select script uploaded previously.
  • Scope
  • Targets: Computers with TouchID enabled

Unfortunately, scoping to only computers with TouchID enabled requires an extension attribute (and a smart group). I have included the extension attribute I use below:

#!/bin/bash
# Check to see if TouchID is enabled and returns the number of enrolled fingerprints per user
touchIDstatus=$( sudo bioutil -s -c | sed 's/Operation performed successfully.//g' )
if [ "$touchIDstatus" != "There are no fingerprints in the system." ]; then
echo "<result>$touchIDstatus</result>"
else
echo "<result>Not configured</result>"
fi

I would also add something to the description in Self Service indicating that the user needs to return and run the policy again after each macOS update, and check the box to ensure that users view the description.

Should you ever need to undo this action, it is as simple as restoring the original sudo file from the one we backed up. The following command can be run with a Jamf policy to restore the original settings:

mv /etc/pam.d/sudo.bak /etc/pam.d/sudo

Detecting if Rosetta 2 is Installed on an Apple Silicon Mac

There are a few different ways to detect if Rosetta 2 is installed on an Apple silicon Mac. Most of them look for a process containing the string oahd. This is because inside macOS, Rosetta is not referred to by name, it is know as OAH.

Adding to the confusion, Apple has made minor changes along the way that may have affected some scripts or extension attribute’s ability to accurately report Rosetta 2 status. One such change occurred in macOS 11.5 where checking for the LaunchDaemon /Library/Apple/System/Library/LaunchDaemons/com.apple.oahd.plist stopped working. As a result, most transitioned to checking for a process containing oahd.

The Jamf extension attribute below sidesteps these limitations. It first checks if the device architecture is Apple silicon (arm64), then checks if the system is able to run x86_64 intel code using the arch binary. It follows that if an Apple silicon device can run intel code, Rosetta 2 must be installed, regardless of if the oahd process is found.

This method is more robust, and less likely to provide a false positive. Additionally, it will not be affected by any future changes Apple may make to Rosetta 2.

#!/bin/sh
# If cpu is Apple branded, use arch binary to check if x86_64 code can run
if [[ "$(sysctl -n machdep.cpu.brand_string)" == *'Apple'* ]]; then
if arch -x86_64 /usr/bin/true 2> /dev/null; then
result="Installed"
else
result="Missing"
fi
else
result="Ineligible"
fi
echo "<result>$result</result>"

Taking that a step further, if we detect that Rosetta 2 is not installed, we will want to get it installed. The following script can be used to do just that.

#!/bin/sh
# If cpu is Apple branded, install Rosetta 2
if [[ "$(sysctl -n machdep.cpu.brand_string)" == *'Apple'* ]]; then
/usr/sbin/softwareupdate –install-rosetta –agree-to-license
fi

Remind Users to Run as Standard with SAP Privileges App

This post is going to cover a set of scripts and launch daemons that can be used alongside the SAP Privileges app to remind users not to abuse admin privileges. I will skip much of the background info on Privileges because that has been covered thoroughly by my fellow mac admins. Inspiration for this tool came from:


The Privileges application allows users to switch from standard to administrator and vice versa. As stated on the Privileges GitHub page, “Working as a standard user instead of an administrator adds another layer of security to your Mac and is considered a security best practice. Privileges helps enable you to act as an administrator only when required.”

While Privileges is excellent at its intended function, you may want some help encouraging users to act as an administrator only when required (instead of setting themselves as an admin and never looking back). Additionally, you may want some way of logging who is using admin privileges for an extended period of time and how often. That’s where PrivilegesDemoter comes in.

PrivilegesDemoter

PrivilegesDemoter consists of two scripts and two launchDaemons. The first launchDaemon runs a script every 5 minutes. This script checks if the currently logged in user (or the last user if there is no current user) is an administrator. If this user is an admin, it adds a timestamp to a file and calculates how long the user has had admin rights.

Once that calculation passes 15 minutes, a signal file gets created. That is where the second launchDaemon comes in. The signal file tells the second launchDaemon to call a Jamf policy. I chose 15 minutes here because that should be more than enough time to perform an admin task or two (like installing an update).

So far we have confirmed that there is an admin user on the machine, and that user has been an admin for more than 15 minutes. The Jamf policy is where all the real work gets done. In the policy called from Jamf we use a jamf helper message to ask if the user still requires admin rights.

  • Clicking “Yes” resets the timer allowing the user to remain an administrator for another 15 minutes, at which point the reminder will reappear.
  • Clicking “No” revokes administrator privileges immediately. 
  • If the user does nothing, the reminder will timeout and revoke administrator privileges in the background.
  • Users may use the Privileges application normally to gain administrator rights again whenever needed.
  • Each privilege escalation and demotion event is logged in /var/log/privileges.log

You can find the PrivilegesDemoter tool as well as deployment instructions in my GitHub here: https://github.com/sgmills/PrivilegesDemoter

Update Inventory (Immediately) After macOS Update

This is related to my previous post Re-enabling Jamf Connect Login after an in-place macOS Upgrade, but without the Jamf Connect part.

When a macOS update or upgrade is performed, often times Jamf Pro will not recognize the update until up to 24 hours later. Depending on how often computers are set to update inventory, it could be even longer.

If you happen to have policies or configuration profiles scoped to devices based on their OS version this delay in inventory information would also delay those actions. Or perhaps a security update has come out and you want to know which devices remain vulnerable. A delay in reporting means you do not have timely information to ensure your mac fleet is protected.

Ensuring Jamf Pro updates inventory immediately after a macOS update can be done rather simply by having Jamf Pro run a script on startup.

The first requirement is to ensure you have the Jamf startup script enabled. Navigate to Settings > Computer Management > Check-In and ensure that the boxes for Create startup script and Check for policies triggered by startup are checked. This ensures our script will run each time the computer boots. (If not using Jamf Pro, consider creating your own LaunchDaemon here.)

Next we upload our script to Jamf Pro. The (below) script performs the following actions:

  1. Gets the current local operating system build.
  2. Checks if there is an existing local plist file for the macOS build version, and creates it if needed.
  3. If the current OS version matches the local plist we assume the OS was not updated, exit with status 0.
  4. If the current OS version does not match the the local plist, we assume the OS was updated, and perform an inventory update.
  5. Update the macOS build in the local plist with the new build version.
#!/bin/sh
# Location of macOS Build plist for comparison
# Subsitute your org name for anyOrg, or place in another location
buildPlist="/usr/local/anyOrg/macOSBuild.plist"
# Get the local os build version
# Using build version accounts for supplimental updates as well as dot updates and os upgrades
localOS=$( /usr/bin/sw_vers | awk '/BuildVersion/{print $2}' )
# If the macOS Buld plist key does not exist, create it and write the local os into it
if ! /usr/libexec/PlistBuddy -c 'print "macOSBuild"' $buildPlist &> /dev/null; then
echo "macOS Build plist does not exist. Creating now…"
defaults write $buildPlist macOSBuild $localOS
else
echo "macOS Build plist already exists. Skipping creation…"
fi
# Get the os from the macOS build plist now that we have ensured it exists
plistOS=$( defaults read $buildPlist macOSBuild )
# If the local OS does not match the plist OS do some maintainance
if [[ $localOS != $plistOS ]]; then
echo "macOS was updated. Performing maintenance now…"
# Update inventory
echo "Updating inventory…"
/usr/local/bin/jamf recon
# Update the local plist file
echo "Updating plist with new OS build version…"
defaults write $buildPlist macOSBuild $localOS
else
echo "macOS was not updated. Nothing to do here."
fi

With this script uploaded to Jamf Pro, the last step is to create a policy that runs it. Note that I have named the policy and the script “macOS Update Maintenance” feel free to name them as you see fit.

  • General
  • Name: macOS Update Maintenance
  • Trigger: Startup
  • Frequency: Ongoing
  • Scripts
  • Select script uploaded previously.
  • Scope
  • Targets: All Managed Clients or All Computers

Now each time one of our Jamf Pro managed macs boots, it will run this script. The script will determine if the macOS build version has changed, then optionally perform a recon so that our inventory records are updated immediately!