In our session, we detailed our journey to automate the developer Mac lifecycle. We tackled the common challenges of manual tracking, potential security vulnerabilities, and inefficient workflows head-on. Our presentation offered a deep dive into the solution we developed, which effectively leverages Jamf Pro, Okta, Slack, and GitHub Actions to automate several key processes.
You can see the session in its entirety here:
For those who attended, or anyone interested in streamlining their Mac device management, you’ll learn how Jack Henry achieved significant improvements by:
Automating device refresh workflows, which not only reduced the need for IT intervention but also greatly improved the user experience.
Integrating Okta to trigger automated actions, such as device locking for departed users, which has significantly enhanced our security posture.
Utilizing the Jamf API and GitHub Actions for custom automation, including automated device tagging and Slack notifications.
Implementing automated reclamation processes, optimizing device replacement cycles, and further improving our security measures.
Automating our retention process for comprehensive device status management, including unmanaging and removing devices from Jamf Pro.
We believe that our journey and the solutions we implemented can provide valuable insights for other organizations facing similar challenges.
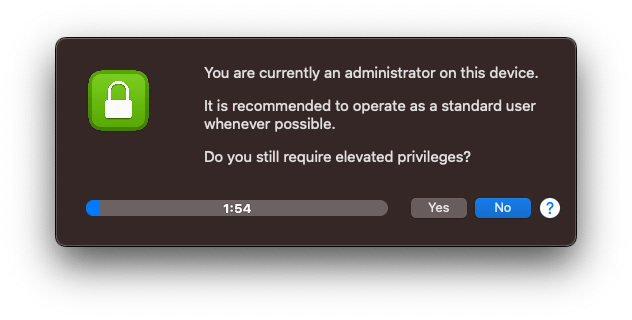
PrivilegesDemoter version 3 is here, and it’s a big update. While the main functions remain, several new options are available to make deployment and configuration much more flexible.
The original posts for previous versions are available here: v1.0 v2.0
PrivilegesDemoter is a script that allows users to self manage local administrator rights, while reminding them not to operate as an administrator for extended periods of time. Additionally, each elevation and demotion event is recorded and saved to a log file.
PrivilegesDemoter 3 has been written to be customizable for a number of different deployment scenarios. PrivilegesDemoter may be used on its own in standalone mode, or conjunction with SAP Privileges. It may be configured to notify users with IBM Notifier, Swift Dialog, or Jamf Helper.
The PrivilegesDemoter script runs every 5 minutes to check if the currently logged in user is an administrator. If this user is an admin, it adds a timestamp to a file and calculates how long the user has had admin rights. Once that calculation passes a certain threshold, the user is reminded to operate as a standard user whenever possible.
Summary of Changes in v3
PrivilegesDemoter now uses just one script and one LaunchDaemon (as opposed to 2 of each in versions 1 and 2)
The script is controlled with a configuration profile (blog.mostlymac.privilegesdemoter).
There is a JSON Schema available for configuring with Jamf Pro.
You can now exclude multiple administrator accounts from demotion.
The _mbsetupuser and root users are now excluded from demotion by default.
Swift Dialog is now available as a notification agent in addition to IBM Notifier and Jamf Helper.
You may now use a custom name for the IBM Notifier binary (if you have re-branded it for your organization).
The demotion reminder threshold can now be set with a configuration profile separately from the SAP Privileges dock tile timeout.
The main text in the reminder can be customized.
You many now configure the user to be demoted silently without a notification at all.
The demotion script now runs locally by default. If you would like it to run from Jamf Pro as it did in versions 1 and 2, you may configure it that way.
You may now customize the Jamf trigger if demoting from a Jamf Pro policy.
The script now allows for standalone elevation and demotion actions (without deploying SAP Privileges) Note: This requires an MDM with the ability to run scripts from a Self Service portal (like Jamf Pro).
The script now includes several new options when running locally. Using the script alone you can elevate, demote, demote silently, print the current user’s status, and calculate how much admin time has passed since the last time PrivilegesDemoter ran.
This blog post outlines using a LaunchAgent that utilizes the PrivilegesCLI to demote users during login. This ensures that all users have standard privileges at the beginning of each user session.
Note: All of the following assumes that the SAP Privileges application is installed.
If that sounds interesting or useful, good news! It is really rather easy to implement.
The LaunchAgent includes a couple of sections:
AssociatedBundleIdentifiers – This section associates the LaunchAgent with the SAP Privileges application so that it is displayed properly in the Login Items GUI on macOS Ventura and newer operating systems.
ProgramArguments – This section runs the following PrivilegesCLI command to remove user rights: /Applications/Privileges.app/Contents/Resources/PrivilegesCLI --remove
RunAtLoad – Ensures that the LaunchAgent runs each time a new user session is loaded.
To implement this LaunchAgent, either build a package or copy the following plist file into /Library/LaunchAgents, and make sure that it has the following permissions: 644 POSIX and root:wheel as owner:group.
This file contains hidden or bidirectional Unicode text that may be interpreted or compiled differently than what appears below. To review, open the file in an editor that reveals hidden Unicode characters.
Learn more about bidirectional Unicode characters
The next time a user logs in, Privileges will ensure the session starts with standard user rights. Users may then use SAP Privileges to grant admin rights again as needed.
I have been doing this little trick for years so I thought I would create a blog post to share it.
Imagine you need to get your company logo onto computers so that you can brand some widget. When using tools that the user can interact with (like Nudge, IBM Notifier, Jamf Helper, SwiftDialog, or DEPNotify for instance) having a familiar logo or icon helps users to understand, verify, and trust the source of that window when it is presented. There’s the added benefit that it looks good too!
This method can be used to get any image file placed in any location, without having to build a package for distribution, all within Jamf Pro.
All you need do is upload an image to the Self Service section of a policy in Jamf, then use curl in a script to download that image from your Jamf Pro server and place it in the specified location. Here’s how I set it up:
Upload the following script to your Jamf Pro server:
This file contains hidden or bidirectional Unicode text that may be interpreted or compiled differently than what appears below. To review, open the file in an editor that reveals hidden Unicode characters.
Learn more about bidirectional Unicode characters
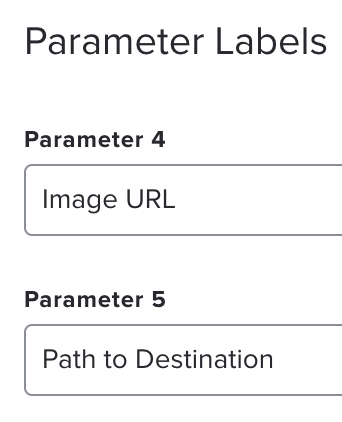
Give the script parameters some useful labels. I used “Image URL” for parameter $4. This is the location of the image we will download. And “Path to Destination” for parameter $5. This is where the image will be saved on disk.
Create a new policy in Jamf Pro and save it. IMPORTANT: When first creating the policy, leave it disabled by unchecking the “Enabled” checkbox.
General
Name: Download Company Logo
Enabled: No
Trigger: Recurring Check-in
Frequency: Once per computer
Scripts
Select script uploaded previously – do not configure any parameter values yet.
Scope
Targets: All Managed Clients or All Computers
Self Service
Check the box for “Make the policy available in Self Service”
Upload the image you would like to distribute.
After creating and saving your policy, go to the Self Service tab and find the icon that you uploaded. Right click and select “Copy Image Address” to copy the URL of the image to your clipboard. Take note of this URL.
While still on the Self Service page for your policy, click Edit in the lower right corner, then deselect the checkbox for “Make the policy available in Self Service”. Even though the policy is no longer available in Self Service, the icon remains so we can still access it in our script.
Select the Options tab, then the Scripts section. Paste the image URL copied in step 4 into the “Image URL” field under Script Parameters.
Enter the full path to where the image should be placed on disk, including the image name, into the “Path to Destination” field under Script Parameters. For example /Users/Shared/logo.png
Return to the General section and check the Enabled box to enable the policy, then Save in the lower right corner.
That’s it. The image will be downloaded to each machine in scope and placed in the location of your choice. Now you can reference that image in other scripts and configurations as needed.
Nudge is an open source application (primarily created by Erik Gomez) that strongly encourages users to apply macOS updates.
Nudge has been written and talked about plenty of times by my fellow MacAdmins, so I’ll spare you the details. Here are some links if you want more info:
Nudge stores information about the next time Nudge will run, the minimum required OS version you have defined, and how many deferrals have been used in the plist located at ~/Library/Preferences/com.github.macadmins.Nudge.plist
Notice this is in the user’s local Library. If we want to report this data, we will need to do it in the user context. I have developed the following Jamf Pro extension attribute to do just that.
The following EA will grab the currently logged in user (or the last user if there isn’t one) and read the requiredMinimumOSVersion key value from the com.github.macadmins.Nudge plist. If a value exists, we use the is-at-least function built in to zsh to compare this to the currently installed macOS version. If an update is required, we report the number of deferrals used. This can be useful to ensure that Nudge is running successfully, or to see which users are procrastinating (and how much).
If the requiredMinimumOSVersion key is not found, the EA will report No minimum required macOS version found
If the requiredMinimumOSVersion key is found, but macOS is already greater than or equal to that value, the EA will report macOS meets minimum required version
If macOS does not yet meet the minimum required version, the EA will report the value found in the userDeferrals key. This key is the sum of userSessionDeferrals and userQuitDeferrals.
And here is that extension attribute. Note that it is written in zsh so that we can access functions specific to that shell. It will not work with a .sh extension.
This file contains hidden or bidirectional Unicode text that may be interpreted or compiled differently than what appears below. To review, open the file in an editor that reveals hidden Unicode characters.
Learn more about bidirectional Unicode characters
This extension attribute reports its result as a string. That means we cannot access the integer comparison tools within a Jamf Pro smart group, but we can use a regex.
I set up a smart group to find all devices where the Nudge deferral value is greater than 0 with the regex: ^[1-9][0-9]*$
As you may be aware, it is possible to use a fingerprint on any TouchID enabled Mac (or Magic Keyboard with TouchID) to authenticate sudo at the command line.
This possibility has been discussed many times by many MacAdmins, and Mac enthusiasts over the years. The earliest mention I could find is from 2017. Cabel Sasser tweeted:
Pro MacBook Pro Tip: have a Touch Bar with Touch ID? If you edit /etc/pam.d/sudo and add the following line to the top…
sudo on the command-line is great. It enforces security and separation by running under your own user, and it logs actions taken using sudo. But it can be a pain to type longer passwords and passphrases repeatedly. By using TouchID to authenticate, we can keep all the security, while reducing long password entries.
All we have to do is edit the file /etc/pam.d/sudo and add the following line at the top:
auth sufficient pam_tid.so
Save and you’re done. However, there are a few caveats. For one, the sudo file gets overwritten with default values each time macOS is updated. That is where our Self Service policy comes in. The script below can be placed in Self Service, allowing users to re-enable the feature with the click of a button after each update.
The script will check if TouchID is already enabled for sudo, and only enable it if needed. The original sudo file gets backed up to /etc/pam.d/sudo.bak.
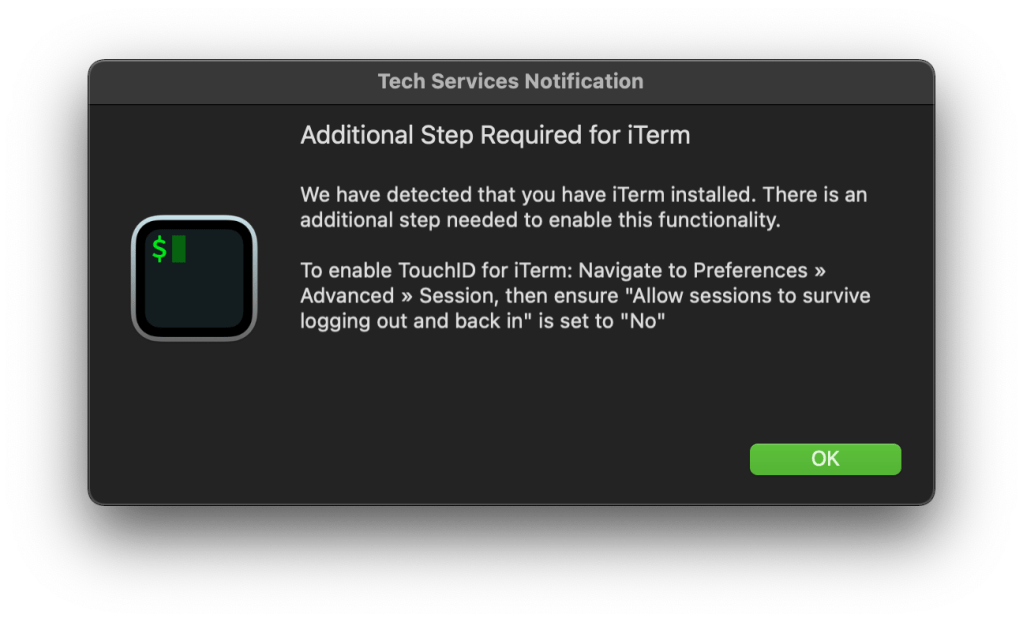
Another caveat is that this feature does not work in iTerm2 unless a specific setting is changed. The script handles that too. If iTerm is installed, it will check if the required setting is enabled to allow TouchID. If the setting needs to be changed, a Jamf Helper message will let the user know what to do. Note this is a one time only change, once the setting is correct, users will not see the following message.
If you do not use Jamf, the Jamf Helper section could easily be replaced with something more appropriate for your environment, or removed altogether.
Without further ado, here is our script:
This file contains hidden or bidirectional Unicode text that may be interpreted or compiled differently than what appears below. To review, open the file in an editor that reveals hidden Unicode characters.
Learn more about bidirectional Unicode characters
# If preference needs to be set, show Jamf Helper window with instructions
if [[ "$iTermPref" == "0" ]]; then
echo "iTerm preference is already set properly. Doing nothing…"
else
echo "Notifying user which iTerm setting needs to be changed…"
# Set notification description
description="We have detected that you have iTerm installed. There is an additional step needed to enable this functionality.
To enable TouchID for iTerm: Navigate to Preferences » Advanced » Session, then ensure \"Allow sessions to survive logging out and back in\" is set to \"No\""
I would advise adding the above script to Jamf Pro, then setting up a Self Service policy like so:
General
Name: Enable TouchID for sudo
Trigger: Self Service
Frequency: Ongoing
Scripts
Select script uploaded previously.
Scope
Targets: Computers with TouchID enabled
Unfortunately, scoping to only computers with TouchID enabled requires an extension attribute (and a smart group). I have included the extension attribute I use below:
This file contains hidden or bidirectional Unicode text that may be interpreted or compiled differently than what appears below. To review, open the file in an editor that reveals hidden Unicode characters.
Learn more about bidirectional Unicode characters
I would also add something to the description in Self Service indicating that the user needs to return and run the policy again after each macOS update, and check the box to ensure that users view the description.
Should you ever need to undo this action, it is as simple as restoring the original sudo file from the one we backed up. The following command can be run with a Jamf policy to restore the original settings:
There are a few different ways to detect if Rosetta 2 is installed on an Apple silicon Mac. Most of them look for a process containing the string oahd. This is because inside macOS, Rosetta is not referred to by name, it is know as OAH.
Adding to the confusion, Apple has made minor changes along the way that may have affected some scripts or extension attribute’s ability to accurately report Rosetta 2 status. One such change occurred in macOS 11.5 where checking for the LaunchDaemon /Library/Apple/System/Library/LaunchDaemons/com.apple.oahd.plist stopped working. As a result, most transitioned to checking for a process containing oahd.
The Jamf extension attribute below sidesteps these limitations. It first checks if the device architecture is Apple silicon (arm64), then checks if the system is able to run x86_64 intel code using the arch binary. It follows that if an Apple silicon device can run intel code, Rosetta 2 must be installed, regardless of if the oahd process is found.
This method is more robust, and less likely to provide a false positive. Additionally, it will not be affected by any future changes Apple may make to Rosetta 2.
This file contains hidden or bidirectional Unicode text that may be interpreted or compiled differently than what appears below. To review, open the file in an editor that reveals hidden Unicode characters.
Learn more about bidirectional Unicode characters
Taking that a step further, if we detect that Rosetta 2 is not installed, we will want to get it installed. The following script can be used to do just that.
This file contains hidden or bidirectional Unicode text that may be interpreted or compiled differently than what appears below. To review, open the file in an editor that reveals hidden Unicode characters.
Learn more about bidirectional Unicode characters
This post is going to cover a set of scripts and launch daemons that can be used alongside the SAP Privileges app to remind users not to abuse admin privileges. I will skip much of the background info on Privileges because that has been covered thoroughly by my fellow mac admins. Inspiration for this tool came from:
The Privileges application allows users to switch from standard to administrator and vice versa. As stated on the Privileges GitHub page, “Working as a standard user instead of an administrator adds another layer of security to your Mac and is considered a security best practice. Privileges helps enable you to act as an administrator only when required.”
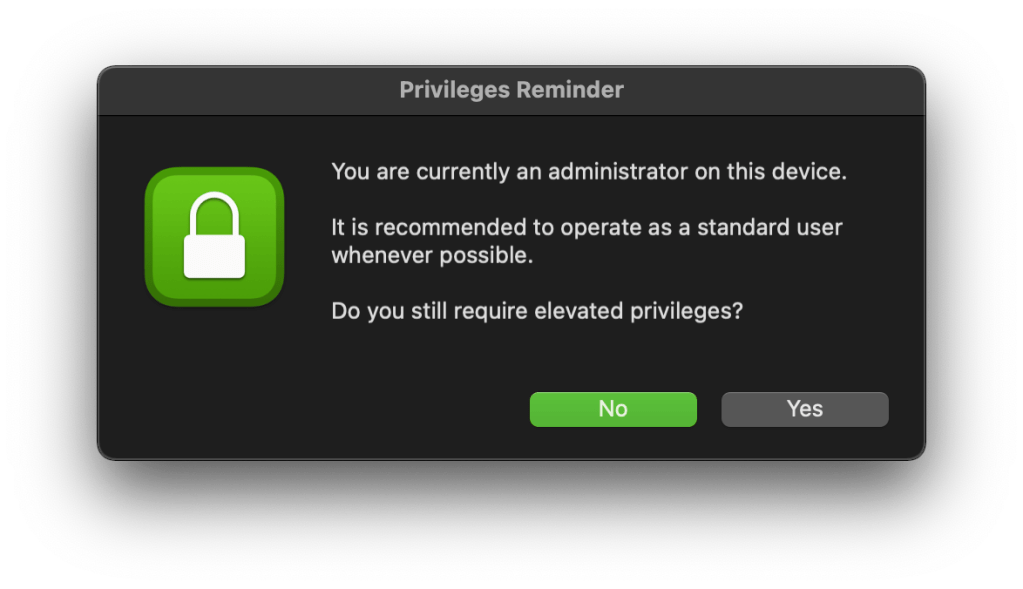
While Privileges is excellent at its intended function, you may want some help encouraging users to act as an administrator only when required (instead of setting themselves as an admin and never looking back). Additionally, you may want some way of logging who is using admin privileges for an extended period of time and how often. That’s where PrivilegesDemoter comes in.
PrivilegesDemoter
PrivilegesDemoter consists of two scripts and two launchDaemons. The first launchDaemon runs a script every 5 minutes. This script checks if the currently logged in user (or the last user if there is no current user) is an administrator. If this user is an admin, it adds a timestamp to a file and calculates how long the user has had admin rights.
Once that calculation passes 15 minutes, a signal file gets created. That is where the second launchDaemon comes in. The signal file tells the second launchDaemon to call a Jamf policy. I chose 15 minutes here because that should be more than enough time to perform an admin task or two (like installing an update).
So far we have confirmed that there is an admin user on the machine, and that user has been an admin for more than 15 minutes. The Jamf policy is where all the real work gets done. In the policy called from Jamf we use a jamf helper message to ask if the user still requires admin rights.
Clicking “Yes” resets the timer allowing the user to remain an administrator for another 15 minutes, at which point the reminder will reappear.
When a macOS update or upgrade is performed, often times Jamf Pro will not recognize the update until up to 24 hours later. Depending on how often computers are set to update inventory, it could be even longer.
If you happen to have policies or configuration profiles scoped to devices based on their OS version this delay in inventory information would also delay those actions. Or perhaps a security update has come out and you want to know which devices remain vulnerable. A delay in reporting means you do not have timely information to ensure your mac fleet is protected.
Ensuring Jamf Pro updates inventory immediately after a macOS update can be done rather simply by having Jamf Pro run a script on startup.
The first requirement is to ensure you have the Jamf startup script enabled. Navigate to Settings > Computer Management > Check-In and ensure that the boxes for Create startup script and Check for policies triggered by startup are checked. This ensures our script will run each time the computer boots. (If not using Jamf Pro, consider creating your own LaunchDaemon here.)
Next we upload our script to Jamf Pro. The (below) script performs the following actions:
Gets the current local operating system build.
Checks if there is an existing local plist file for the macOS build version, and creates it if needed.
If the current OS version matches the local plist we assume the OS was not updated, exit with status 0.
If the current OS version does not match the the local plist, we assume the OS was updated, and perform an inventory update.
Update the macOS build in the local plist with the new build version.
This file contains hidden or bidirectional Unicode text that may be interpreted or compiled differently than what appears below. To review, open the file in an editor that reveals hidden Unicode characters.
Learn more about bidirectional Unicode characters
With this script uploaded to Jamf Pro, the last step is to create a policy that runs it. Note that I have named the policy and the script “macOS Update Maintenance” feel free to name them as you see fit.
General
Name: macOS Update Maintenance
Trigger: Startup
Frequency: Ongoing
Scripts
Select script uploaded previously.
Scope
Targets: All Managed Clients or All Computers
Now each time one of our Jamf Pro managed macs boots, it will run this script. The script will determine if the macOS build version has changed, then optionally perform a recon so that our inventory records are updated immediately!
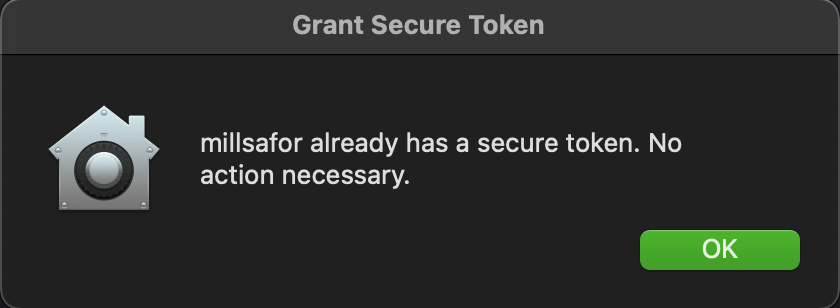
Occasionally end users may end up without a secure token. This attribute is required to enable FileVault on any macOS device. Additionally, it is required for the end user to install updates on Apple silicon devices (this is a little complicated but for the purpose of this post I am ignoring volume ownership, as it is functionally equivalent to secure token in this respect).
Use the following script in a Self Service policy to grant the end user a secure token. This script will check if the currently logged in user has a secure token. If so, a notification informs them that no action is required.
If the currently logged in user does not have a secure token you will be guided through the process to grant one. In order to grant a secure token to a user without one, an account with a secure token must be used. The script will find all secure token users on the system and list them for you. Select an account that you already know the password for.
Next you will be prompted for the existing secure token user’s password. This is required to grant the token to other users
Then, you will be prompted for the end user’s password to complete the process.
Finally, the script will check if a bootstrap token is escrowed with MDM, and escrows the token if needed.
The script is available below:
This file contains hidden or bidirectional Unicode text that may be interpreted or compiled differently than what appears below. To review, open the file in an editor that reveals hidden Unicode characters.
Learn more about bidirectional Unicode characters
# If no secure token admin users, show dialog stating such
/usr/bin/osascript -e "display dialog \"\" & return & \"There are no secure token admin users on this device.\" with title \"Grant Secure Token\" buttons {\"OK\"} default button 1 with icon POSIX file \"$brandIcon\""
exit 0
else
# Have user select a secure token user they know the password for
adminUser=$( osascript -e "set ASlist to the paragraphs of \"$(printf '%s\n' "${SecureTokenUsers[@]}")\"" -e 'return choose from list ASlist with prompt "Select a user you know the password for:"' )
# Get a secure token users password
adminPassword=$( /usr/bin/osascript -e "display dialog \"To grant a secure token\" & return & \"Enter login password for '$adminUser'\" default answer \"\" with title \"Grant Secure Token\" buttons {\"Cancel\", \"Ok\"} default button 2 with icon POSIX file \"$brandIcon\" with text and hidden answer
/usr/bin/osascript -e "display dialog \"\" & return & \"Password Verification Failed. Please try again.\" with title \"Grant Secure Token\" buttons {\"OK\"} default button 1 with icon POSIX file \"$brandIcon\""
exit 1
fi
# Get the logged in user's password via a prompt
echo "Prompting ${userName} for their login password."
userPassword=$( /usr/bin/osascript -e "display dialog \"To grant a secure token\" & return & \"Enter login password for '$userName'\" default answer \"\" with title \"Grant Secure Token\" buttons {\"Cancel\", \"Ok\"} default button 2 with icon POSIX file \"$brandIcon\" with text and hidden answer